Assembling your AR15 lower receiver is fairly easy to do. All you need are a few simple tools, a stripped AR15 Lower Receiver, a Lower Parts Kit, and a Buttstock Assembly.
The stripped lower is the part that the ATF considers being the “gun”. This is the only part that you cannot have shipped directly to your home. You will need to either go to a gun store and purchase a stripped lower, or buy one online and have it shipped to your FFL so that they can transfer it to you.

An AR15 Stripped Lower Receiver
Most any lower from any reputable manufacturer will do. Just be sure that it is forged 7075-T6 aircraft aluminum alloy, hard-coat anodized. I’ve owned and/or had experience with a variety of stripped lowers, including but not limited to DPMS (pictured above), Stag Arms, RRA, MEGA, LAR, Double Star, etc… all of which have been great and I have seen no problems with them.
Here is a picture that shows the specific parts of a Lower Parts Kit (“LPK” for short). I prefer Stag Arms LPK’s.

Lower Parts Kit
Here is a list of the few tools you will need to complete the assembly of the AR15 lower.
-Pin Punches
-Small gunsmithing hammer/mallet
–CAR Stock Wrench or an AR15 armorers tool (for carbine stock installation)
-3/16 Allen wrench and/or Flat Head Screw Driver (depending on the stock and pistol grip screw)
-Loctite (Non-permanent Loctite is recommended on all screws)
Now, if you have all of the appropriate tools and parts, you are ready to begin.
Magazine Catch/Button Release – Insert the magazine catch in the receiver (on the side with the roll mark/serial number) and install the magazine catch spring from the other side.
Then push the magazine button onto the spring and spin it onto the threaded end of the magazine catch, tightening it until it is flush. Now your first step is completed.
Bolt Catch – Then insert the bolt catch spring and plunger (with the plunger facing outwards on top of the spring).
Place the bolt catch roll pin in the slot above the magazine catch from the right side, tap lightly with light hammer/punch to get it started but not all the way in. Install the bolt catch pushing the catch in towards the spring while lining up the hole in the bolt catch with the hole in the side of the receiver.

Tap the roll pin in lightly avoiding damaging the lower by hitting it directly (I use a pin punch for this very reason). When the pin is inserted and flush with the hole you inserted it into your second step is completed.

Front Pivot Pin – This is a tricky one that can take a few tries and it frustrates many. This tends to be an easy step for me but I know that several people have issues with it. The problem is that the spring can launch the pivot pin detent pretty far if you fail to do it correctly. So I recommend that you set up a “backstop” (a small mailing box usually does the job well) in the direction the spring would shoot the pivot pin detent so that you can more easily recover it and the spring if you don’t get it right the first time.
On the right side of the receiver in front of the magazine well there is a hole where you insert the spring. To begin, insert the spring and then the detent on top. Using the pivot pin, push the detent back far enough for you to insert the pivot pin into its hole. If you did it correctly, the pivot pin will slide into position and the pivot pin detent will line up onto the pivot pin securing it into position.

Trigger Guard – Simply insert the pin on the trigger guard in the side nearest the magwell.

Now, you will align the other side of the trigger guard with the holes on the rear of the lower and insert the pin, tapping lightly to install.
Some people choose to squeeze the pin in place by using a block of some sort (thin block of wood) or even a pair of pliers with tape around the ends to push the pin(s) into place, so they don’t have to hammer anything in. This is in an attempt to avoid potentially damaging the receiver. This is a part of the receiver that is more vulnerable to being damaged by excessive force and/or out of spec pin/hole sizes.
Trigger Assembly – Install the trigger spring on the trigger with the “coils” of the spring on both sides of the trigger and the two legs pointing forward and down (refer to the picture above showing the complete LPK for reference). Install the disconnector spring in the rear of the trigger.
Drop the trigger assembly into the receiver and place the disconnector on top of the disconnector spring with the notch on the disconnector over the spring. You will need to insert the trigger pin in the receiver through the disconnector and to the other side of the receiver locking the disconnector into place above the spring and the trigger assembly. It may take a bit of wiggling and then tapping with a hammer to work it in just right. Just be patient and don’t damage your receiver!
TIP: I highly recommend that you dip the end of the trigger pin in oil such as CLP prior to inserting it, this will help you immensely as you try to work the pin into place. Same goes for the hammer pin as well. If at any time you are inserting a pin and struggling with getting it to go smoothly, try a little bit of oil.
Hammer Assembly – Squeeze the hammer assembly down into the receiver while lining up the holes for the hammer pin. This part can be a little tough to do. After you have installed the hammer assembly, cock the hammer.

You can pull the trigger to test for function if you’d like at this point, however, be sure to keep the hammer from slamming down with it’s full force in this condition (or any time the lower is not assembled with the upper), as it could possibly damage the receiver. I usually place a couple fingers over the front of where the hammer would hit when performing this operation on a lower minus the upper.
Safety Selector/Pistol Grip – This is an easier step. From the left side (the side with the roll mark), install the safety selector. Then install the selector detent and spring (detent goes in first) on the right side of the receiver directly below the selector where you will install the pistol grip. Then put the pistol grip on, being sure that the spring is properly in place with the holes in both the receiver as well as the pistol grip. Don’t let the spring get bunched up.

You will screw the pistol grip screw into place so that it properly holds the pistol grip (and everything else like the spring and selector detent). Make sure to use the lock washer. I also like to use non-permanent loctite on the screw in order to help hold it in place.

Rear Takedown Pin – This step is similar to the last one. You will install the rear takedown pin detent in from the backside of the receiver with the spring behind it. Install the takedown pin. Now, the spring will get its tension from the full installation of the butt stock.
Buttstock – Apply some thread locker on the threads of the buffer tube/receiver extension (make sure the castle nut is in place on the extension if you are using a carbine stock). Screw the receiver extension into receiver slowly making sure the takedown spring is still in place but don’t screw it in all the way just yet.
On the receiver in front of the threads, place the buffer retainer spring and buffer retainer into the receiver. Thread the buffer tube until it holds the buffer retainer into place, but don’t screw it so far that it completely restricts the movement of the buffer retainer.
Now you will want to tighten the stock into place. For an A2 stock, you will need to screw it in from the very back of the stock. With a carbine stock, you will probably want to use a stock wrench to tighten the castle nut onto the end plate (or burnsed style sling mount).
Insert the buffer spring and then the assembly into the receiver extension until the buffer retainer holds the spring and assembly into the buffer.
That’s it, you did it!

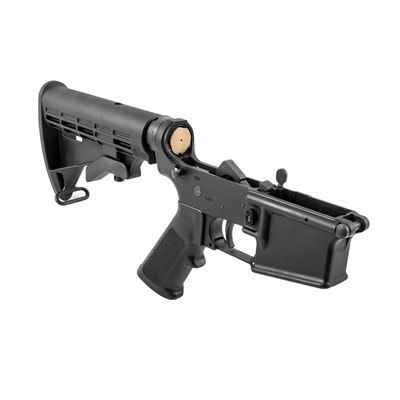
Left to right: A Complete Carbine AR15 Lower, Complete A2 AR15 lower